When I started bow hunting I realized that being a long-range rifle shooter that many of the same principals applied to be accurate with a bow. Within months of practicing/obsessing I was more accurate than many guys at the range that had been doing it for decades. Now I’m not saying this for bragging rights, there are many of people more accurate when it comes to flinging sticks than me, only to highlight that there are a few, not all, universal principals that apply between a rifle and bow. In my short time with a bow, the aim small miss small method has put me on a fast track to accuracy. Although some of the procedures leading up to the shot are different, the science behind good shooting fundamentals with a bow or rifle are quite the same.
We won’t go through the setting up procedures for a long range rifle shot as that’s a different article in itself, so we’ll skip to what I call the actions on portion which is simply aiming and shooting. Assuming with a rifle you are set up for the shot and you’ve collected the correct environmental data by whatever means you’re using (kestrel/rangefinder with built-in ballistics & weather function/old beat up DOPE book). You’re dialed for elevation and now your settling yourself into the rifle for the shot. When I’m behind a rifle, I find the natural point of rest with a shooting bag or shooting glove under the butt of the gun so you’re not straining to hold the crosshairs where they should be. You’re now squeezing the trigger, envisioning doing so straight back perpendicular with your shoulders (assuming you are correctly laying behind the gun). Let’s apply those to a bow.
Again, like a rifle, let’s assume you’ve done your talking points, for me they are: Stance, Grip, Knuckle, Kiss, Sight, Level, and Squeeze straight back…. release. I might be the only one that has kiss as a talking points. I’ll admit, not the most masculine but memorable none the less.
- I prefer shoulder width with the front foot canted slighting forward.
- Grip: Is the handle following the lifeline in your palm and is the grip free of torque?
- Knuckle: 1st forefinger knuckle (base of forefinger) buried in the pocket under my ear.
- Kiss: Is the string lightly touching the corner of my mouth and the tip of my nose.
- Sight: Are both circles (peep and sight) lined up with the same amount of shadow or rings (depending on type of sight) around the sight.
- Level: Self-explanatory, more important the further your target is, anything off level is called cant, left or right.
- Squeeze: Squeeze the trigger slowly. Once the arrow releases attempt to look for it, this will naturally help with follow up.
Let’s talk distance. I have no clue why people go to the range and practice at 30yrds and seldom go further. Even if you’re hunting the thick woods of the east coast and the furthest shot is 20yrds, you’re not exercising the principals of what it takes to accurately release the arrow as much as you would if you practice at a longer distance. In this regard both rifle and bow are EXACTLY alike. The longer distance you practice at, the more you’re forcing yourself to master the shooting fundamentals. That being said I’m not saying you should only practice at long distance then come hunting season you don’t understand why you missed a 30yrd shot on an animal.
Here’s what I do. The range I go to allows 90yrd max but if no one else is there I back off to 100, or even 110 if possible. I go weeks sometimes months without ever shooting another distance. One month out from hunting season I take the bow to the trusty bow shop (plug, in my case Bow N Arrow Shop of Lakeside, Ca.) Bruce, the owner, is awesome and most important in a bow shop, personable. I have them do a once through, check the timing of the cams, usually there’s a slight adjustment to be made, then ensure everything else looks good, D-Loop’s not becoming frayed and strings aren’t to worn. I start this a month out for a worst case scenario, allowing me time to order parts and sight in again from scratch. Usually a small timing adjustment on a cam means a slight adjustment with Point of Aim (POA) so I’ll need to tweak the sights a little.
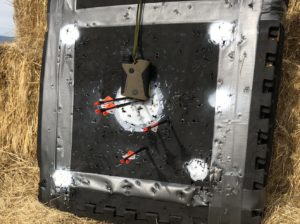
Then I start from scratch shooting at 20yrds on one day. 30yrds the next…all the way out to the limits of the sight tape at 100yrds. Then I add hash marks with a fine tipped permanent marker for 110yrds. I do just one distance a day while I’m fresh. So I know that each yardage is gnats a## on. At two weeks out, I only shoot practice broad heads. This gives me time for rest or sight adjustments if needed. Goal is to have confirmed every yard line from 20-100y with the practice broad heads then if I have time on the back end I continue working on the fundamentals at 100yrds, because as you know, with practice heads, your release point has to be perfect. In summary, practice far and everything else is a chip shot. Not to mention, if conditions are right and the animal is running the script that you hoped for, a 80yrd shot into that bull elk with a 14” average vital zone is ethically attainable.
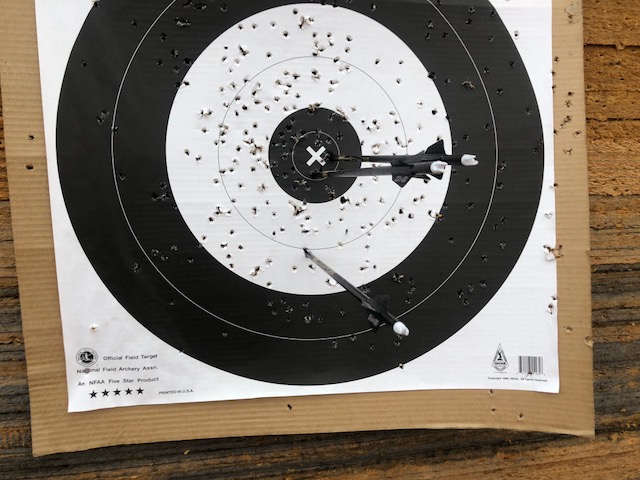
I encourage you to stretch your comfort zones at the range, when your groups are tightening up step back even further. Key here is don’t wait until you have the perfect 3” group at 60yrds to move back to 70, you are just postponing better training and productivity with your time. Move back when you’re hitting the target consistently in what would be in the vital zone; by moving back sooner you’re forcing your mind and body to hyper focus on the fundamentals that much more with every shot. Here’s a test, proof is in the pudding. If you have the setting on the sights and you are safely hitting the target at your usual range, shoot 10 or 20yrds further. Then go back to a closer range and you’ll see what I mean.
Backcountry Precision
Blood. Sweat. Reward